

Table of Contents
How to Breed Hornworms
Most people don’t put very much time into finding good feeder insects. They stick with mealworms or superworms, which are easy to get, but also not the best nutritionally. And that makes sense. There isn’t a lot of information out there about how to breed highly nutritious feeder insects, like hornworms.
But we don’t like to settle for subpar feeder insects. That’s why we put together this comprehensive guide to hornworm breeding. So that people at any skill level can learn to raise their own nutritious feeders with ease, and avoid having to buy hornworms online every other week for your voracious dragon.
In this article, we’ll talk about everything to do with hornworms. What they are, why they’re great feeder insects, and how to raise them successfully. Let’s get to it.
What Are Hornworms
The hornworm is a humble caterpillar which turns into the infamous five-spotted hawkmoth (Manduca quinquemaculata). These beautiful insects are pests to some, and valuable to others.
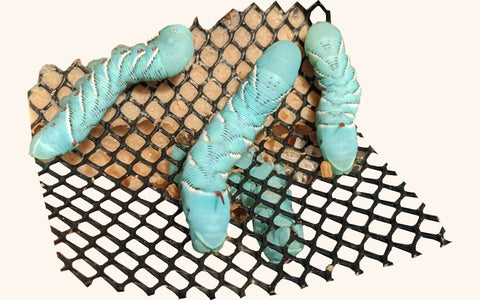
As a caterpillar, the hornworm has a bluish green to lime green color, with yellow stripes on its sides. They are mostly sedentary and spend most of their time feeding and growing. Before pupating they will sometimes reach four(!) inches in length.
After pupating into a moth, the adults feed on flower nectar. They have gray and black bodies with some small yellow hints on their abdomens. They mate and lay their eggs, usually on tomato plants.
Bad for Plants
Most people know hawkmoths as crop pests. That’s because, as we stated above, they lay their eggs on tomato plants. When the eggs hatch (which they do by the thousand), they destroy the plant’s leaves and fruits.
Because of this, hawkmoths are enemies of farmers. They are commonly killed with pesticide and reviled as a problem insect.
Great for Reptiles
But, if you’re a reptile owner, the hornworm can be your best friend. That’s because hornworms are highly nutritious, easy to raise, and make great feeders for reptiles like bearded dragons.
They have a very high protein/fat ratio, making them ideal for reptiles that need lean protein. Their large body size makes them good prey items for even the largest indoor reptile pets. And they don’t bite or sting, so they’re safe to give to your scaly friends.
How do Hornworms Compare to Other Feeder Insects?
But how do they stack up against more common feeders like roaches and mealworms? Let’s look at some data and find out.
Reptile Dietary Needs
Omnivorous reptiles, like bearded dragons, need a mix of lean protein from insects and leafy greens. Because they’re sedentary, you want to limit fat content in their diets.
It’s very easy for beardies to become obese in captivity, which can cause health problems. So ideally, we want a protein source with a very high ratio of protein to fat. You can always supplement this with fatty “snack” insects. But your main feeder insect should be as lean as possible.
They also need lots of calcium. The ideal calcium to phosphorus ratio for bearded dragon food is 2:1. This usually requires you to dust your feeder insects with extra calcium.
Hornworm Nutritional facts
The hornworm is one of the leanest protein sources available. Compared to dubia roaches, hornworms contain 12% more protein and 4% less fat.
Hornworms also contain lots of fiber (9.4%) and moisture (85%). These are both very important to your pet’s health.
Finally, hornworms have about the same calcium to phosphorus ratio as a dubia roach, 1:3. This means you should dust them with calcium before giving them to your pet. It’s not ideal, but for the nutritional content, hornworms are still one of the best feeder insects.
Can I Use Wild Hornworms?
Absolutely not. As a rule, you should never give your reptile wild insects. They may contain parasites or diseases which can be passed on to your reptile. You should only ever feed your reptile with hornworms you purchased or bred yourself.
How Difficult are Hornworms to Breed?
Compared to other breeder insects, hornworms are fairly easy. There are a few steps in the process, and you’ll need to buy some special equipment to house them at different life stages.
But there are some big pluses to keeping hornworms. They’re very sedentary and don’t try to escape their enclosure. As adults, the moths are very easy to keep and nice to look at. As roommates, moths beat roaches any day of the week.
In addition, it’s really easy to feed and gut load hornworms. They will eat just about anything. What we recommend below is using pre-made chow, but you can also give them compost scraps.
What You Need to Breed Hornworms
Breeding hornworms doesn’t take a lot of fancy equipment. Most of the stuff you’ll use to raise your hornworms can be bought at the grocery store or hardware store. Here’s a quick list of necessary goods:
- Hornworm eggs or live hornworms
- Gutter guard screen
- Hornworm chow
- Deli cups
- A medium-sized plastic storage container (under-the-bed storage size)
This is all you really need to raise hornworm caterpillars. If you want to go a step further and raise moths, you’ll just need a few more things:
- A large-sized plastic storage container (45-64 Qt size, clear plastic is best)
- A few aluminum baking tins
- Coco coire
- A mesh cage for adult moths. You can use a reptile cage or a soft-walled lepidtarium
- A small tomato plant
- A hummingbird feeder and hummingbird food
If you plan on raising multiple generations of hornworms, this whole list will be necessary.
How to Raise Hornworms from Eggs
Raising hornworms from eggs just takes a few extra steps. If you’re doing multiple generations of hornworms, this will be important to know. Let’s get started.
Preparing Your Deli Cups
To begin, set your hornworm eggs aside. You need to prepare your deli cups. This is where your hornworms will eat and grow until they’re able to move on their own. Deli cups are prepared so that the food is on the top with a ladder of gutter guard leading up to it.
To create this ladder, put a length of gutter guard into your cup. The gutter guard should have a U shape, with the U touching the bottom of the cup.
Cut a few holes in the bottom of the cup and thread zip ties through them to attach the gutter guard to the bottom. Then, using hot glue, fill the holes. This will stop the chow from running out of the bottom.
To prepare your chow, heat some water and mix the dry chow into it. Mix thoroughly until no clumps remain. Pour the wet chow into your deli cups and let it cool for at least an hour. Once it’s dry and cool, it will be hard enough to stay in place when upside down.
Now, put your eggs on the underside of the lid of your deli cup. Flip the deli cup upside-down and set it on top of the lid.
When the eggs hatch, the tiny worms will climb the gutter guard instinctively. They’ll find the hornworm chow and start eating. As they grow larger, their poop (or frass) will fall onto the cup’s lid. Once a day, take the cup off the lid and clean out the frass. This will let some fresh air in and keep things clean.
Outgrowing Their First Home
You’ll be surprised at how fast hornworms grow. Once they begin to crowd each other out, it’s time to move them to a medium-sized storage container.
The setup for these storage bins is similar to the deli cups. Cut a few pieces of gutter guard to size and place them so that they sit a half inch or so above the bottom of the container.
This will allow you to lift the hornworms out and clean under them. Cut a few small holes in the lid for air and make sure to clean the container regularly.
Next, gently move your hornworms into the storage bins. Make another batch of hornworm chow, let it cool in a separate container, and then break it up into big pieces. Set these pieces on the mesh and the hornworms will go to town on them.
At this point, your hornworms are good to feed to your pets! Just pick them off when they’re the right size and give them to your bearded dragon (or whatever kind of reptile you have) for a high-protein meal.
You want the worms to be the size of the space between your bearded dragon’s eyes when you feed them to it.
Time to Pupate
If you want to keep a few hornworms around to get more eggs, pick a few and let them keep growing. Hornworms will grow to around three inches long before they start to pupate.
Once they reach their maximum size, their skin will become lighter. You’ll start to notice a dark, pulsing line on their backs, just under the skin. This is how you know they’re ready to pupate.
The worms know what’s happening. Once they’re ready to transform into moths, they’ll stop eating and start moving more. What they’re looking for is soft, moist soil to burrow in. You need to provide them with some kind of substrate so they can do their thing and become moths.
Transfer the pupating hornworms into their third plastic storage container. This one is the largest. Like the others, create some small holes in the lid for air exchange.
Next, prepare a few high-walled aluminum baking tins full of coco coire for substrate. These tins go into the bins.
The coco coire inside should be moist, but not soaking. If the substrate is too dry, it will cause defects in the adult moths. If it’s too wet, it can cause mold to grow and kill your worms. To keep it moist, open it every few days and mist it with a spray bottle.
Transfer your hornworms into their new home. The worms will burrow down into the coco coire and disappear for a few weeks. But you don’t actually want to leave them in there for that long.
After the first week, you can dig the pupae up and move them to new containers with fresh dirt. The old dirt can contain mold or rot that can kill your whole crop of moths.
Getting Ready to Hatch
When you move them into new substrate, you’re going to put them into their final home, a mesh cage or lepidtarium. This is where they’ll hatch and spend their lives as moths.
When you move your hornworms, put them in fresh aluminum baking containers full of coco coire. Be very gentle when handling them.
After a month or so in the lepidtarium, the pupae will hatch into hawk moths. After they hatch, you can remove the aluminum baking tins. But by that time, you will need to add two things to the lepidtarium.
The first is a hummingbird feeder full of hummingbird food. This will provide the moths with all the nutrition they need. We recommend buying rather than mixing this yourself, an imbalance of stuff in the food could kill your moths.
The second is a small tomato plant in a pot. This is where the hawk moths will mate and lay their eggs.
Once the moths start laying eggs, be vigilant. Hawk moths lay tons of eggs very quickly. You’ll need to pick the new ones daily or you’ll quickly lose track.
Re-starting The Cycle
And just like that, you have yourself a fresh batch of eggs! Now you can re-start the process from the beginning. You’ll have enough feeder insects to give your scaly buddy food for the rest of his or her life!
mike, my dude (and I have many suspicions that you’re genuinely a city-dweller playing at farmer…), you’re the one doing a “disservice to farmers” with your angrily self-righteous comment on a wonderfully informative blogpost. This is very clearly an article/post on how to raise feeder insects at home. None of the resulting hornworms/hawkmoths are being released into the wild. I know my poultry absolutely love being given some good, homegrown (non-toxic!) hornworms. Varied diet = healthier birds = more eggs of higher quality = happy (repeat) customers. Have a day.
critterdepot, thank you for sharing quality + easy-to-understand information regarding the care/lifecycles of feeders you have available. I’ll be sending this particular article on to some friends who have been interested in raising insects for their own flocks. Have a nice day!
Thank you so much for the info. I currently breed dubia and mealworms for treats for my chickens and a main food source for 4 bearded dragons, 3 leopard geckos, and a crested gecko. Now that I’ve done some research and got great advice from you I’m going to be breeding hornworms also instead of buying them. Thank you
Thank you for this information. I really appreciate it. I had a question. In the storage bin where you set them up in a large group, how do you attach the food to the top of the wire mesh they climb on? To keep it from falling into the frass? Thanks again!
You people are doing a disservice to farmers! Can you people please stop breeding these terrorist pests, honestly why would you tell people breed a trash moth that we dont need at all, pollination is fine in the farming community I assure you we dont need these horrible moths reeking havoc of farmers that already have enough problems, just so a few boomer grandmas can enjoy a couple more bloom sites. Funny how im finding so much information on breeding these things during a time when people are encouraged to grow food not inedible flowers please people dont listen to these uneducated people trying to spread misinformation. Your flowers will bloom just fine without these pests
I use pepper plants in my flight pen so if i miss an egg or 2 and they hatch out the worms won’t be poisonous if the eat tge leaves.